
Welcome to Lesson 2 of Module 1 (Mission & Foundation)
Tanager-1 data products are delivered in HDF5-EOS (HDF5) format. For new users, these files can feel like a “black box”, large, deeply nested, and hard to interpret at first glance. In this course, one of our goals is to make that structure transparent so you can move confidently from data access to analysis.
At Planet, we’ve found the fastest way to learn how to navigate complex Tanager-1 HDF5 files is to build a small HDF5 file by yourself, modeled on HDF5-EOS. Once you understand how the pieces are assembled, you’ll gain “X-ray vision” when opening real mission data.
What is HDF5?
HDF5 (Hierarchical Data Format version 5) is a high-performance “container” designed to store vast amounts of complex data. It is more than just a file format; it is a flexible data model capable of storing heterogeneous (different) types of data within a single container, as shown in Figure 1.
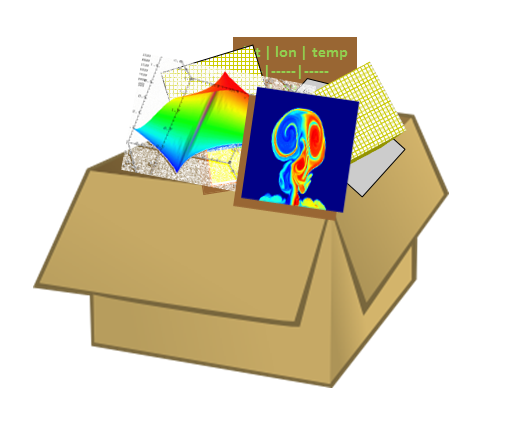
Figure 1:HDF5 Data Model. Credit: The HDF Group.
Think of an HDF5 file not as a single document (like a .txt or .jpg), but as a file system inside a single file. It contains “folders” (Groups) and “files” (Datasets), allowing you to organize massive datasets logically.
HDF5 vs. HDF-EOS5: What’s the Difference?
Yes.
HDF-EOS5 is a specific Earth-science data model built on top of HDF5. HDF-EOS5 was developed by NASA to ensure Earth-observing satellite data is structured consistently, self-describing, and interoperable across missions and analysis tools.
It does this by defining standard Earth-science data models and metadata conventions while still using HDF5 underneath.
The 3 Core Building Blocks of HDF5
As we mentioned, HDF5 is essentially a file system inside a file. To navigate it, you need to understand its three primary components, all of which start from a common origin (Figure 2).
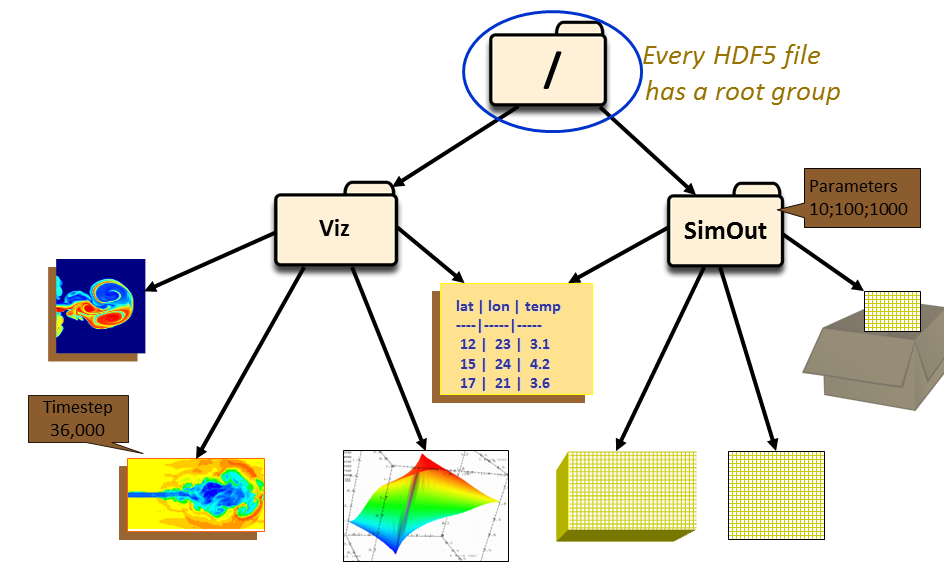
Figure 2:HDF5 file object structure. Credit: The HDF Group.
The Root Group (/): The Foundation
Before you can access any data, you must know where to start. Every HDF5 file has a Root Group, denoted by a forward slash / (similar to the root directory on Linux or the C:\ drive on Windows).
When you open an HDF5 file in Python, you are technically opening a handle to this Root Group.
All other groups and datasets live inside this root (e.g.,
/Science/Data).
Groups: The Folders
These are the containers that organize your data.
Just like folders on your computer, Groups can hold other Groups or Datasets.
They create the “hierarchy” in Hierarchical Data Format, allowing you to organize complex mission data logically (e.g., separating
surface_reflectancecube fromuncertainty_surface_reflectancedata).
Datasets: The Actual Data
These are the files inside the folders, the reason you opened the HDF5 file in the first place.
Unlike a simple text file, a Dataset is a Multidimensional Array.
It can store images (2D), spectral cubes (3D), time-series tables (1D), or simple values.
Attributes: The Metadata “Sticky Notes”
These are small pieces of metadata attached to any Group or Dataset.
Think of them as “sticky notes” describing the data.
They answer critical questions without you having to guess: What are the units?, What is the fill value for missing data?, Which sensor took this image?
What We’ll Build
In this lesson, we’ll build a simple HDF5 file that mimics the HDF5-EOS file named my_experiment.h5 that represents a sensor experiment.
We will:
Create an HDF5 file
Organize it using groups and datasets
Add attributes to document what the data means
The Target Structure:
my_experiment.h5  (The File / Root Group)
│
├── .attrs  <-- (File-level Attribute - Global Metadata)
│   │
│   ├── Mission = "Tanager-1"
│   ├── Institution = 'Planet Labs PBC'
│   └── date_created = '2026-01-25'
│
└── raw_data  (Group: The Folder)
    │
    └── sensor_01  (Group: The Folder)
        │
        ├── image_band  (Dataset: 100 × 100 pixels)
        │   │
        │   └── .attrs  <-- (Dataset-level Attribute)
        │       ├── units: "W/m^2/sr/nm"
        │       ├── fill_value: -9999
        │       └── "wavelength": 550 nm
        │
        └── timestamps   (Dataset: 100 time points)
Are you ready? Let’s go!
1. Setup: Install the Libraries
To work with HDF5 files in Python, we need two key libraries:
h5py: The interface for creating, reading, and writing HDF5 files.numpy: Used to generate the numerical data (array) we will store.
# !pip install numpy h5py2. Create the File (the Root Group)
Every HDF5 file begins as a blank canvas. In the code below, we use h5py.File() to create the physical file on your disk. It acts as the constructor. It creates the file and returns a file object (often variable f) that represents the Root Group (/).
import h5py    # Library for working with HDF5 files
import numpy as np   # Library for numerical array operations

# Define the path and name of the file to create or open
file_path = 'my_experiment.h5'

# Create a new HDF5 file (or overwrite if it exists) and assign it to variable 'f'
f = h5py.File(file_path, 'w')3. Build the Skeleton (Groups)
Now that we have established the Root (/), we need to organize our “container.” Just as you organize files on your computer into nested folders, HDF5 uses Groups to create hierarchy.
In the HDF5 universe, Groups are functionally identical to folders/directories on your operating system. They do not hold the actual data values themselves; their sole purpose is to organize the Datasets (which we will discuss next).
We are about to build the following nested structure:
We are building this structure:
File (Root) ➞ Group: raw_data ➞ Group: sensor_01
# Run this cell only once per fresh file, or rerun the file-creation cell first.

# Create a group (like a folder)
raw_data_group = f.create_group('raw_data')

# Create a nested group inside 'raw_data'
sensor_group = raw_data_group.create_group('sensor_01')
We created raw_data first, got that object, and then created sensor_01 inside it.
You can actually create the entire nested structure in one line using the full path! HDF5 is smart enough to create the intermediate folders automatically if they don’t exist.
# You can create nested groups in one line using absolute paths.

# If creating the group for the first time, you could use:
sensor_group = f.create_group('raw_data/sensor_01')

# However, to prevent an error if the group already exists, use require_group:
sensor_group = f.require_group('raw_data/sensor_01')
4. Store the Data (Datasets)
We have our folders (Groups), but they are empty. Now we need to create Datasets.
If Groups are the folders, Datasets are the files (like .txt, .jpg, or .csv files) inside those folders. In HDF5-EOS, a Dataset is essentially a multidimensional array (a matrix) saved to the disk.
Key Concept: If you are familiar with Python, think of an HDF5 Dataset as a Numpy array that lives on your hard drive instead of in your RAM. You can slice it, index it, and query its shape just like you would in Numpy.
We will populate our sensor_01 group with two synthetic datasets:
image_band: A 100x100 matrix of random numbers (simulating raw sensor band).timestamps: A simple list of 100 numbers (simulating acquisition times).
# 1. Generate dummy data (The "Numpy Bridge")
# We create standard Numpy arrays in memory first.

data_matrix = np.random.random((100, 100)).astype('float32')
timestamp_data = np.arange(100)

# 2. Store the data inside 'sensor_group'

# image_band
dset_band = sensor_group.create_dataset(name= 'image_band',  # dataset name in the group
                                        data= data_matrix,   # numpy array
                                        chunks=True,         # chunked storage for efficiency
                                        )

# timestamps
dset_time = sensor_group.create_dataset(name= 'timestamps',
                                        data=timestamp_data,
                                        chunks=True,
)Now that we have written the data, our file structure looks like this:
my_experiment.h5 (/)
|
└── raw_data <-[Group]
    |
    └── sensor_01 <-[Group]
        |
        ├── image_band    (Dataset: 100x100 float32)
        |
└── timestamps (Dataset: 100 int64)5. Add Context (Attributes)
You now have an HDF5 file with datasets organized inside groups. As the creator, you are the only one who knows what each dataset represents and over time, even you may forget. Attributes (metadata) solve this problem by embedding context directly into the file, making your data self-documenting and shareable.
This is the “secret sauce” of HDF5.
In a standard binary file, a value like 42.5 carries no meaning. Is it temperature? Pressure? A pixel index? You would need a separate README or manual to interpret it. HDF5 attributes eliminate that dependency by storing descriptive metadata alongside the data itself.
HDF5 solves this with Attributes (.attrs). These are small pieces of data attached directly to Groups or Datasets.
We will add metadata at two different levels:
Global Metadata (File Level): Attached to the Root (
/). This describes the entire mission (e.g., “Experiment Name”, “Date Created”, “Institution”).Local Metadata (Dataset Level): Attached specifically to our
image_band. This describes the physics of that specific array (e.g., “Units = Radiance”, “Wavelength = 550nm”).
# 1. Global Attributes (The "Label on the Cabinet")
# These describe the file as a whole. We access the .attrs dictionary of 'f'.
f.attrs['mission'] = 'Tanager-1'
f.attrs['institution'] = 'Planet Labs PBC'
f.attrs['date_created'] = '2026-01-25'

# 2. Local Attributes (The "Label on the Document")
# These describe the physics of the specific dataset 'image_band'.
# Note: We use the variable 'dset_band' we created in the previous step.

dset_band.attrs['units'] = 'W/m^2/sr/nm'
dset_band.attrs['fill_value'] = -9999         # Standard code for "No Data"
dset_band.attrs['wavelength'] = 550.0 # Center wavelength in nm (Green)# If you forget this, your HDF5 file might be unreadable!
f.close()
print(f"Mission Complete: '{file_path}' has been successfully built and closed.")Mission Complete: 'my_experiment.h5' has been successfully built and closed.
What Just Happened? The Black Box is Gone!
Congratulations. You have successfully engineered your first self-describing, hierarchical database file.
At the start of this tutorial, HDF5 might have felt like a “Black Box”, something opaque and complex. But look at what you have done:
You built the Groups (the skeleton).
You created the Datasets (the organs).
You attached the Attributes (the identity).
Because you built it, the mystery is gone. You know exactly where the data lives and how to find it. You have turned the Black Box into a Glass Box.
Why HDF5? (The NASA Standard)
You might be asking: “Why go through all this trouble instead of just saving a CSV or a TIFF?”
The answer lies in how major agencies like NASA and Planet Labs manage petabytes of Earth Science data.
The “Lazy Loading” Superpower
The most critical concept in modern remote sensing is Lazy Loading.
When you open a massive file (which can be Gigabytes in size), HDF5 does not read the data into your RAM.
Standard Files (CSV/TIFF): Opening a 5GB
.tiffoften forces your computer to read all 5GB at once. This fills your RAM immediately and can crash your system before you even see the first pixel.HDF5 Files (.h5): Opening a 5GB
.h5file takes milliseconds and uses almost zero RAM.
How? It reads only the “Table of Contents” (the internal hierarchy). You can browse the groups, check the attributes, and verify the metadata instantly. The heavy data is only pulled into memory if and when you specifically ask for a slice of it.
Real-World Proof: NASA’s Hierarchical Data
NASA’s Earth Observing System (EOS) chose HDF5 as the standard format for missions like MODIS and ICESat-2 because satellite data is never “just an image.”
A single NASA HDF5 file is a self-contained database. It holds:
The Imagery: (The heavy 3D arrays)
The Context: (Latitude/Longitude arrays for every pixel)
The Metadata: (Sensor temperature, cloud cover %, orbit path)
If NASA used TIFFs, they would need thousands of separate files to describe one scene. With HDF5, everything is in one “container,” and scientists can access just the metadata (kilobytes) without touching the imagery (gigabytes).
References
To deepen your understanding of HDF5 and HDF-EOS5, we recommend exploring these official resources:
| Resource | Description |
|---|---|
| HDF5 Getting Started | Official HDF5 documentation and tutorials from The HDF Group |
| HDF-EOS5 Standards | NASA Earthdata overview of HDF-EOS5 for Earth Observation |
| HDF-EOS5 Data Model (PDF) | RFC specification for file format and library |
| h5py create_dataset | h5py API reference for dataset creation |
Summary & Next Steps
You’ve built your first HDF5 file and understand its structure. Now that you know how groups, datasets, and attributes fit together, the next step is to leverage that knowledge to explore files with ease, including the “Lazy Loading” superpower that lets you browse massive files without loading everything into memory.
Next Up: In Lesson 3 of Module 1, we’ll learn how to open and navigate HDF5 files programmatically, read metadata, and extract data using slicing.
See you in Lesson 3 of Module 1: Looking Inside the Box You Built!